


Boat Solar Panels Installation: The Ultimate Guide to Boat Solar Power
Marine Solar Installation Guide
🔹 Introduction to Solar Energy on Boats

Boat solar panels are transforming onboard energy systems and have become essential in the world of boating. Whether to gain autonomy, ensure reliable electrical supply on board, or reduce dependence on equipped ports, installing solar panels on a boat meets practical needs, far beyond simple comfort.
Whether it's a coastal sailboat, a cruising catamaran, or a motorboat moored at a post, each type of navigation can benefit from a well-sized solar system. With increasingly compact, efficient, and easy-to-install kits, energy autonomy is accessible to everyone, including beginner sailors.
This guide is designed to accompany you step-by-step, from the basics to the most precise technical choices. Objective: to enable you to install or optimize your marine solar system with confidence.
1. Why install a solar panel on your boat?
✅ Safety and autonomy on board
A boat solar panel ensures a slow and continuous charge of the batteries, which is crucial for maintaining the battery bank in good health, avoiding deep discharges, and extending their lifespan. This is particularly important when the boat is moored or docked for several weeks.
👉 During winter, when a boat is often unused, a small 20 to 30W boat solar panel is enough to compensate for natural voltage losses and low permanent consumptions such as alarms and monitoring systems.
🌞 Energy autonomy
An onboard solar system offers significant energy independence. It allows you to stay moored longer without compromise and avoids having to run the engine solely to recharge the batteries, which consumes fuel and wears out the alternator.
💡 A 50 to 130W solar panel can largely suffice to power navigation lights, an automatic bilge pump, a compression cooler, and essential onboard devices, including a VHF or GPS in case of breakdown, thanks to a direct connection via the regulator.
🛟 Battery safety and maintenance
A well-powered boat is a safer boat. Even remotely, a solar system continues to:
- Maintain a stable voltage for the monitoring system
- Power automatic pumps in case of infiltration
- Avoid unpleasant surprises when restarting, such as a flat battery or crystallized electrolyte
🔋 A battery maintained by a gentle and regular charge loses less capacity over time and requires less replacement, which is crucial for long-term safety and reliability.
2. How Boat Solar Panel Works
A boat solar panel system operates on a simple principle: converting sunlight into electricity to recharge the boat's batteries. This current is then used to power all electrical devices: lighting, instruments, bilge pump, refrigerator, etc. But behind this apparent simplicity lies a technical installation where each component has a specific role.
🔄 Marine Solar Panel Circuit Diagram
Here is the typical path of electricity in a marine solar circuit:
[Sun] → [Solar Panel] → [Charge Regulator] → [Batteries] → [Onboard Consumers]

The panel captures light and generates direct current (DC), often between 17 and 22V. This current is then regulated to match the voltage admissible by the batteries (usually 12V or 24V). The regulator plays a key role as a stabilizer and protector, preventing any overcharge. Finally, the batteries store the energy, available at any time for onboard needs.
🧩 Essential components
Here are the indispensable elements of a photovoltaic system for a boat:
- Solar panels: Fixed on the deck, bimini, or aft balcony, they transform solar radiation into direct current. Their efficiency depends on their technology, tilt, and exposure.
- Charge regulator: It prevents battery overcharge, manages the float phase, and extends the lifespan of the battery bank. It must be correctly sized relative to the power of the solar panel(s).
- Batteries: They store the generated electricity. These can be engine batteries, service batteries, or both (thanks to a dual-output regulator). The solar system keeps these batteries charged over the days.
- Cables and fuses: The current must flow without loss or risk. Marine cables with double insulation (ISO 6722 standard) are essential, as are well-calibrated fuses to protect the circuit.
- Junction boxes, cable glands, and connectors: These accessories ensure the water-tightness of the cable passage through the deck, prevent infiltrations, and allow secure connection. A junction box with a removable cover is highly recommended to facilitate future checks.
⛵️ To remember: A good marine solar system relies on the balance between components, not just the power of the panel. An incorrectly sized regulator, an undersized cable, or poor sealing can compromise the entire installation.
3. Choosing the Right Boat Solar Panel
Choosing the panel is undoubtedly the most strategic step in designing a marine solar system. It must meet both the real energy needs on board, space constraints, and the specific conditions of sailing at sea: spray, salt, vibrations, variable inclination, partial shading, etc.
⚡️ Power according to usage (20W, 50W, 130W…)
Sizing depends primarily on what you want to power. Here are some benchmarks:
| Usage on board | Recommended power |
|---|---|
| Maintaining engine battery charge | 20–30W |
| LED lighting, automatic bilge pump | 30–50W |
| Navigation instruments, VHF, 12V fridge | 50–80W |
| Autonomy for 2 batteries (service + engine) | 100–150W |
| Offshore navigation with autopilot and fridge | 200–300W |
🔳 Types of solar panels: Rigid, Semi-flexible, Marine
| Rigid panels with aluminum frame | Semi-flexible panels | Reinforced marine panels ("walkable") |
|---|---|---|
 |
 |
 |
| ✅ Affordable price and very good long-term durability ❌ Not walkable ❌ Requires rails, pads, arch support, or dedicated structure 📍 Best for stern arch, bimini frame, aft gantry, or fixed support |
✅ Lightweight and easy to adapt to slightly curved surfaces ✅ Very clean visual integration on the roof ❌ Less mechanically resistant than rigid framed panels ❌ Not designed for regular foot traffic 📍 Best for cabin roof, coachroof, or canopy |
✅ Ultra-thin, non-slip, and designed for occasional passage ✅ Better resistance to UV, salt, impacts, and harsh marine use ✅ Ideal where every centimetre matters ❌ More expensive than standard panels 📍 Best for deck areas or boat roofs where a low-profile walkable solution is needed |
⚠️ Beware of shading: even partial shade on an unprotected panel can reduce its production by 70%. Panels of the same type connected in parallel allow better resilience to shade (provided they are well-matched).
🔗 Connecting solar panels: in parallel or in series?
Solar panels can be connected in parallel or in series, depending on the specific needs of your installation.
- Parallel connection: The panels are connected so that all positive terminals are connected and all negative terminals are connected together. This maintains the same voltage while adding the currents. It is ideal for increasing power without changing the system voltage. In case of partial shading, such as that caused by a sail, panels connected in parallel continue to operate independently, meaning that shading on one panel will not significantly affect the production of the other panels.
- Series connection: The panels are connected so that the positive terminal of one panel is connected to the negative terminal of the next panel. This adds the voltages of the panels while maintaining the same current. However, in the case of shading on one panel, the production of the entire system can be greatly reduced, as the current is limited by the least efficient panel.
For a boat where partial shading can be frequent due to sails or other obstacles, a parallel connection is generally more efficient and resilient.
4. Which charge regulator to choose?
The charge regulator is the heart of the solar system. It ensures the connection between the panel and the battery while protecting the latter from overcharging or inappropriate discharges. Choosing a suitable regulator guarantees both the performance of the installation and the longevity of your batteries.
Role and protections of a charge regulator
| Function | Description |
|---|---|
| Voltage adaptation | Adapts the panel voltage to that of the battery (12V or 24V) |
| Overcharge protection | Avoids damage due to battery overcharge |
| Charge management | Automatic control of Bulk, Absorption, and Float phases |
| Polarity protection | Protects against connection reversals |
| Current return blocking | Prevents current returns to the panels at night |
| Result: the batteries are always optimally charged, without intervention. | |
📊 Comparison: PWM vs MPPT Charge Regulator
| PWM (Pulse Width Modulation) | MPPT (Maximum Power Point Tracking) |
|---|---|
| Simple, robust technology with very low power draw | Maximizes charge even in low sunlight or shaded conditions |
| Works best with 12V panels that match the battery voltage | Converts excess panel voltage into usable current — up to 30% more output |
| Great for small boats or winter battery maintenance | Recommended for systems over 100–150W or when panels are in series |
| Lowest cost, minimal electronics, very tolerant to marine humidity | Now affordable and increasingly popular for marine installations |
| ✔️ Ideal for small boats, simple setups, and off-season battery care | 🔥 Recommended in 95% of cases to optimize solar output onboard |
👉 Conclusion: for a boat, a well-sized PWM regulator is often the best option.
🔀 Single-output vs dual-output
On many boats, there are two batteries:
- Engine battery
- Service battery
A dual-output regulator allows charging both batteries from a single panel:
- It gives priority to the service battery
- Then sends the excess to the engine battery
- Avoids having to install an additional coupler or VSR
This is the simplest solution for cruising sailboats or catamarans.
📺 LCD or LED display, winter mode
| Regulators with LCD screen | Regulators with LED |
|---|---|
| ✅ Display voltage, current, and charge status ✅ Allow quick diagnosis ✅ Some models are remote (discreet mounting) |
✅ Simpler, cheaper ❌ Less precise for status tracking |
💡 In winter, opt for a "hibernation" or "prolonged float" mode to avoid unnecessary microcharges and preserve the batteries.
📌 Example configuration:
- 100W panel (≈ 5.7A)
- 10A minimum PWM regulator (with 15 to 20% safety margin)
- If 2 batteries → 10 or 15A dual-output model
5. Wiring, Fuses, and Safety on Board
A solar installation is not just about placing a panel and connecting it to the battery. Wiring plays a critical role: a poor choice of cable size, an inappropriate fuse, or a bad connection can lead to energy loss or even risks of heating or fire.
📏 Recommended cable sections
The longer a cable is or the more current it carries, the thicker it must be to limit voltage drop. Here are some practical guidelines for 12V installations up to 10 meters of total cable:
| Panel power | Approximate current (A) | Minimum recommended section |
|---|---|---|
| 20–30W | 1.5–2 A | 1.5 mm² |
| 50–80W | 3–5 A | 2.5 mm² |
| 100–150W | 6–9 A | 4 mm² |
| 200–300W | 12–17 A | 6 mm² |
✅ Use flexible, multi-strand cables with double insulation
✅ Marine cables certified ISO 6722 (resistant to heat, hydrocarbons, and vibrations)
📉 Maximum length and voltage losses
Voltage drop becomes critical beyond 5 meters. If you need to cross the boat from end to end:
- Increase the cable section
- Limit splices
- Plan a neat and protected routing in ducts or conduits
💡 A voltage drop of 3 to 5% maximum is generally tolerable.
🧪 ISO standards, wire colors, marine connectors
- Red = +, Black = –
- Crimp connections, no wire nuts or electrical tape
- Use IP67 waterproof cable glands
- Junction boxes with screwed or clip-on cover
- Roof or cable glands glued with Sika for deck penetration
⚠️ Never drill blindly. Check for other cables under the deck. Ideally, drill above an accessible technical compartment.
🔥 Suitable fuse according to power
The fuse is essential between the regulator and the battery.
| Panel power | Recommended fuse |
|---|---|
| Up to 100W | 10–15 A |
| Up to 150W | 20 A |
| 200W and above | 25–30 A |
✅ The fuse should be placed as close as possible to the battery, in a quality marine fuse holder
✅ Use a dedicated inline fuse (not a free slot on the onboard panel)
💡 In case of a short circuit or regulator failure, this is your only protection against a fire.
🔧 In summary:
- Prefer quality marine cables, correctly sized
- Secure and protect each connection
- Mandatory fuse and recommended watertight junction box
Check our solar Panel Wiring Guide – 12V / 24V / 48V
6. Mounting Boat Solar Panels: Locations & Methods
The ideal spots for boat solar panels are a determining factor for their performance and durability. It must receive maximum sunlight while being protected from shocks, shading, and frequent crew passage. The fixing must resist vibrations, spray, and UV while ensuring good mechanical strength over time.
🧭 On bimini, deck, cabin roof, or aft balcony
Here are the most common locations according to the type of panel:
| Location | Advantages | Disadvantages | Recommended panels |
|---|---|---|---|
| Fore deck | Optimal exposure, easy access | Risk of passage/trampling | Reinforced marine or rigid |
| Cabin roof | Flat area, stable, few obstacles | Risk of shade depending on the rigging | Semi-flexible or marine |
| Canopy/bimini | Unused surfaces, few shocks | Less accessible, vibrations | Flexible, lightweight panel |
| Aft balcony | Good exposure, away from the passage | Requires a specific support (tube or hoop) | Rigid with pads or rails |
💡 Always think about avoiding shaded areas: even a halyard or a sheet can reduce efficiency by 50%.
Explore our Boat Solar Panels Collection for pre-cut panel kits and mounts.
🔩 Supports: PVC pads, rails, glue, screws
| Type of support | Advantages | Disadvantages | Use |
|---|---|---|---|
| PVC pads (for rigid panels) |
|
|
📍 Installation without drilling the panel or deck (except securing screws) |
| Stainless steel rails or Z supports |
|
|
📍 Reserved for fixed and robust installations |
| Direct glue (semi-flexible / marine) |
|
|
📍 Ideal for curved surfaces, such as roof or aft deck |
🌫 Shade and obstacle management
- Install the panels away from winches, cleats, masts, antennas, deck panels
- Prefer two small panels to one large one if there is a risk of partial shading
- Slightly orient the panel towards the south (for boats at a fixed post)
🔧 Walkable panels (reinforced marine type) are the only ones that tolerate occasional walking on them. For all other models: avoid walking areas.
🧵 Tips for invisible and watertight wiring
| Tip | Description |
|---|---|
| Cable passage | Route the cables through the inside of the bimini or in a conduit under the deck. |
| Junction box | Use a watertight roof gland or a junction box with IP67 cable glands |
| Box gluing | Glue the box onto the deck with Sikaflex or a marine equivalent |
| Surface Preparation | Lightly sand the surface before gluing for better adhesion |
| Watertightness test | Always test the water tightness with water after 24 hours of drying |
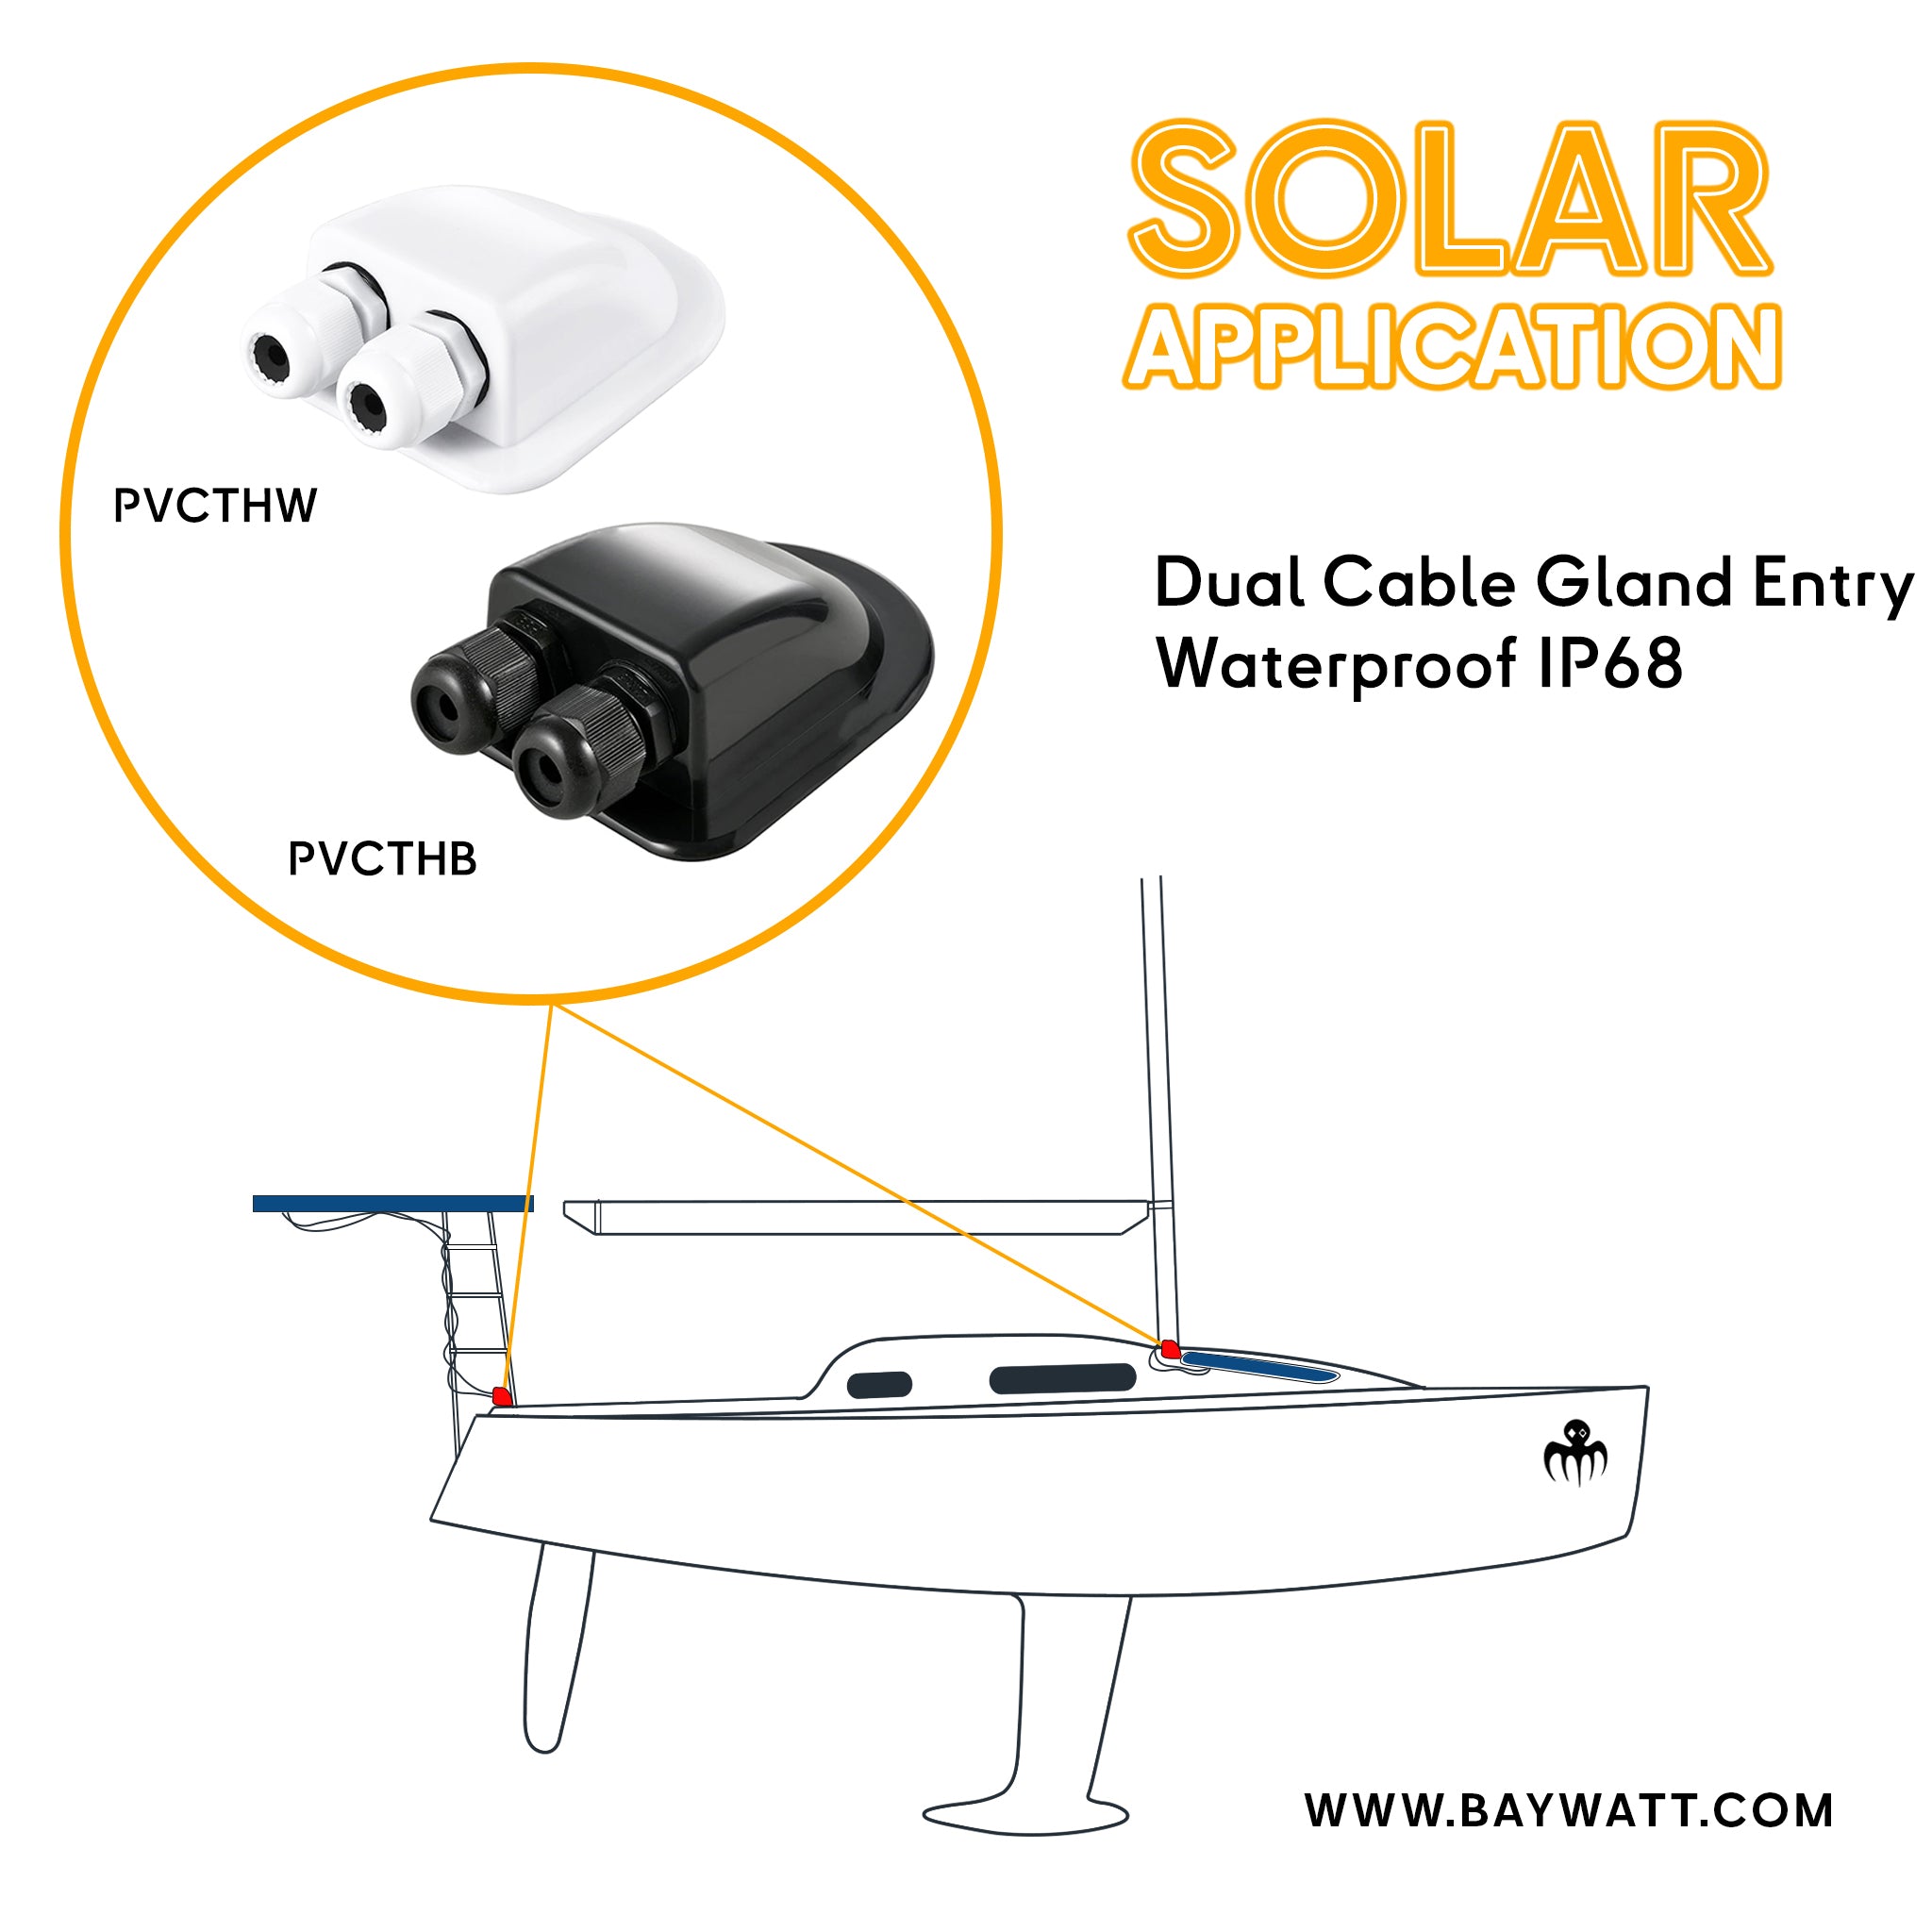
For a clean and reliable marine installation, the deck cable entry should remain compact, watertight, and easy to service later.
A proper dual cable gland helps route the solar cables through the deck without leaving exposed holes or weak sealing points. It also keeps the finish cleaner than improvised silicone-only solutions.
✅ Better water tightness
✅ Cleaner routing on deck
✅ More professional finish for a permanent marine installation
⚠️ Safety advice: avoid screws in areas of low thickness or sandwich construction. Prefer glue or dedicated mounting areas when drilling is not appropriate.
7. Solar installation: DIY or professional?
Installing a solar panel on your boat is within the reach of a good DIYer, provided you prepare your project well. But in some cases (difficult access, complex wiring, need for warranty), it is better to call a professional.
✅ Installation checklist
| Key steps | Tools to provide |
|---|---|
| 📏 Measure and position the panel (avoid permanent shade) | Tape measure, pencil, or marker |
| 🔩 Prepare the fixing (gluing or screwing watertight) | Cordless drill, stainless steel drill bits, screwdriver |
| 🧱 Drill and secure the cable passage | Roof gland or junction box, Sikaflex 291i / 252i adhesive sealant |
| 🔌 Install the regulator near the batteries | Screwdriver, cable ties |
| 📡 Pull the cables without friction (via lockers or conduits) | Wire strippers, cable cutters, ties |
| ➕ ➖ Connect everything: correct polarities, fuses close to the batteries | Multimeter for voltage verification |
| ⚡ Test the system (production, voltage, heating) | Multimeter, visual and tactile control |
🧰 Basic tools list
- Tape measure
- Marker
- Drill + stainless steel drill bits
- Flat & Phillips screwdrivers
- Wire strippers
- Cable cutters
- Multimeter
- Light sander or abrasive paper
- Polyurethane adhesive sealant (Sikaflex type)
⏱ Estimated installation time
| Task | Estimated time |
|---|---|
| Preparation and panel placement | 2 to 3 hours |
| Drilling and cable passage | 1 to 2 hours |
| Regulator fixing and wiring | 1 to 2 hours |
| Tests and final verification | 30 minutes |
| Total | ~7 hours over 1 to 2 days |
💡 If gluing with complete hardening (polyurethane glue), plan for installation over two days.
🚩 Points of vigilance
- Do not drill without knowing what is underneath (wires, sandwich, insulating foam)
- Avoid poor contacts or cable twists.
- Never short-circuit the battery: always insert a fuse between the battery and the regulator
- Never connect the panels to the regulator without a battery connected first
👷♂️ When to Hire a Pro for Boat Solar Panel Installation?
- If your system exceeds 200W or includes multiple panels
- If you have no experience in 12V electricity
- If you want a warranty on the installation (approved installation)
- If the wiring passes through difficult-to-access or structural areas
🔋 Recommended configuration:
- Panels ≥ 300W combined
- High-capacity regulator or multiple regulators
- Slow-discharge batteries 300–600Ah
- Installation on cabin roof or pavilion
- 📌 Objective: partial or total self-sufficiency
🎯 Recommended all-in-one kits
For each configuration, complete solar kits (panel + regulator + cable + mounting + fuse) allow for quick and consistent installation. Here are examples of standard high-performance kits:
| Type of boat | Recommended kit |
|---|---|
| Motorboat | 30W kit with 5A regulator |
| Cruising sailboat | 100W kit + 10A regulator |
| Catamaran / Trawler | 2x100W kit + 20A regulator |
💡 Make sure the kit is compatible with 12V, with marine-quality components (watertight connectors, ISO cable, stainless steel screws).
8. Which configuration for which boat?
Each boat has specific energy needs. The choice of the solar system therefore depends on the size of the unit, the duration of use (day trip or cruise), the presence of energy-consuming equipment, and especially the available space to install the panels.
Here is an overview of typical configurations, with concrete recommendations.
| 🚤 Motorboat | ⛵ Coastal sailboat | ⛵⛵ Cruising sailboat or catamaran | 🛳 Trawler, barge, or liveaboard boat |
|---|---|---|---|
⚙️ Typical needs:
|
⚙️ Typical needs:
|
⚙️ Typical needs:
|
⚙️ Typical needs:
|
🔋 Recommended configuration:
📌 Ideal option: semi-flexible panel kit + simple regulator |
🔋 Recommended configuration:
|
🔋 Recommended configuration:
|
🔋 Recommended configuration:
|
9. Maintaining Your Solar Panels for Peak Output
A well-installed marine solar system is generally reliable and autonomous, but to ensure lasting performance, regular maintenance is essential. Between salt, humidity, UV rays, and boat movements, many elements can influence efficiency.
🔋 Checking the charge level
Regularly check the voltage of your batteries (12.6–12.8V at full charge for an AGM/GEL lead battery).
A regulator with an LCD makes this reading easier: it indicates the instantaneous production (in A), the voltage (in V), and sometimes the residual capacity.
With an LED regulator, monitor the signals (flashing, colors) indicating the charging phases.
💡 If your battery drops below 12V regularly, it means your production is insufficient or there is excessive consumption on board.
🧽 Cleaning and visual inspection
Clean the panels once a month (or after each salty navigation) with:
- A soft, non-abrasive cloth
- Warm fresh water
- A little mild soap if necessary
❌ Avoid aggressive products, solvents, metal sponges, or high-pressure cleaners.
Visually check:
- Absence of cracks or bubbles in the panel
- Condition of cables (wear, UV, friction)
- Connectors (absence of corrosion or oxidation)
- Panel fixing: screws, pads, glue still in place?
❄️ Behavior in winter or during non-use
If your boat remains afloat or in a winter port:
- A small 20 to 30W solar panel is enough to maintain the batteries
- Keep the regulator in "float" or "hibernation" mode
If the boat is completely dismantled:
- Disconnect the battery or the panel to avoid unnecessary wear
- If you leave the panel active, ensure the regulator is properly connected first (never leave the panel in an open circuit)
Remember to deeply recharge your batteries at least once a quarter, even with a panel on board.
🎯 In summary:
- Regularly clean the panel and visually monitors its condition
- Check the voltage of your batteries once a week during the high season
- Prepare for winter with a charge maintenance panel or a clean circuit shutdown
10. Frequently Asked Questions (FAQ)
| Question | Answer | ||||||||||||
|---|---|---|---|---|---|---|---|---|---|---|---|---|---|
| Can you walk on a marine solar panel? | Yes, but only on certain models called "walkable": reinforced marine panels with a non-slip coating. Standard rigid and semi-flexible panels are not designed to support human weight, even partially. Walking on them can damage the internal cells in an invisible but irreversible way. | ||||||||||||
| How many solar panels are needed to be self-sufficient? |
It all depends on your consumption. As an indication:
💡 On average, a 100W panel produces between 400 and 600Wh per day in summer. Total autonomy requires good sizing of the batteries in parallel. |
||||||||||||
| Can you connect multiple solar panels together? |
Yes, but with precautions:
Always use panels of the same type, the same technology, same power to avoid imbalances. ⚠️ If you combine panels, the regulator must be able to handle the total power + 15% margin. |
||||||||||||
| Is it useful to connect the engine and service battery to the same panel? |
Yes, it's a great idea. With a dual-output regulator, you can charge:
✅ This avoids letting the engine battery drain during wintering ✅ No need for a separate coupler or manual management |
||||||||||||
| Should a circuit breaker be installed in the solar system? |
It is not mandatory, but highly recommended:
|
||||||||||||
| Do you need an MPPT regulator for a boat? |
👉 Generally, no. MPPT regulators are only effective in installations:
⚠️ On a boat, with low voltages, short cables, and possible shading areas, a good PWM is more stable, economical, and suitable. |
||||||||||||
| What happens if the regulator fails? |
💡 All the more reason to use a fuse and never connect a panel directly to the battery. |
||||||||||||
| How do you know if your system is working well? |
|
Conclusion
Installing a solar system on a boat is now more accessible and more efficient than ever — provided you clearly define your needs, choose compatible components, and follow proper safety and wiring practices.
Rather than focusing only on power ratings, it’s better to design your setup based on real-world usage and installation constraints:
-
🔹 Simple configurations (<150W)
Ideal for winter storage, maintenance charging, or powering basic devices (GPS, LED lights).
• A PWM regulator is often enough when the panel voltage closely matches the battery (e.g. 12V to 12V)
• Robust and cost-effective for seasonal or low-power setups
• Less suited for high-voltage panels or optimized performance -
🔹 Performance setups (≥150W, elevated panels, or shaded areas)
Designed for daily autonomy (fridges, navigation electronics, lighting).
• An MPPT regulator is strongly recommended when the panel voltage is significantly higher than the battery voltage
• Offers better efficiency in partial shade or variable sunlight (sails, rigging, etc.)
• Requires more planning but ensures optimal energy yield over time
⚠️ Every boat is unique: deck layout, battery setup, shading, or available space all influence the best configuration for your system.
🔧 Our advice for a successful project:
• Have your configuration reviewed by a marine professional if in doubt
• Double-check cable sizing and panel/regulator compatibility before installation
🔌 Need help with wiring?
See our dedicated article with clear diagrams for 12V, 24V, and 48V systems — including series, parallel, and hybrid setups.
👉 Solar Panel Wiring Guide – 12V / 24V / 48V


