


Marine Battery Switches: A Comprehensive Guide with Basics, Pro Tips & Installation Steps
Marine battery switches perform one vital task: they control which battery bank powers or charges what. Choose the wrong switch—or use it the wrong way—and you can end up with a silent starter, dead fuses, or a cooked alternator. Below is a practical overview of Baywatt switches, compact models, and the thermal circuit-breaker options that round out a safe installation.
Explore our full range of Battery Switches to find the right model for your boat — from compact rotary types to selector switches and isolators.
1. Why Separate Battery Banks?
Most boats keep at least two batteries:
• Start bank – delivers the high-cranking amps your engine needs
• House bank – feeds lights, pumps, electronics, and accessories
Isolating them prevents the house loads from draining the start battery overnight and lets you shut the entire system down when you leave the boat.
A third battery is often dedicated to a windlass, bow thruster, or a second engine on twin-motor vessels like catamarans.
2. Manual Baywatt Marine Battery Switches
| Switch Type | Positions | Continuous Rating* | Typical Craft |
|---|---|---|---|
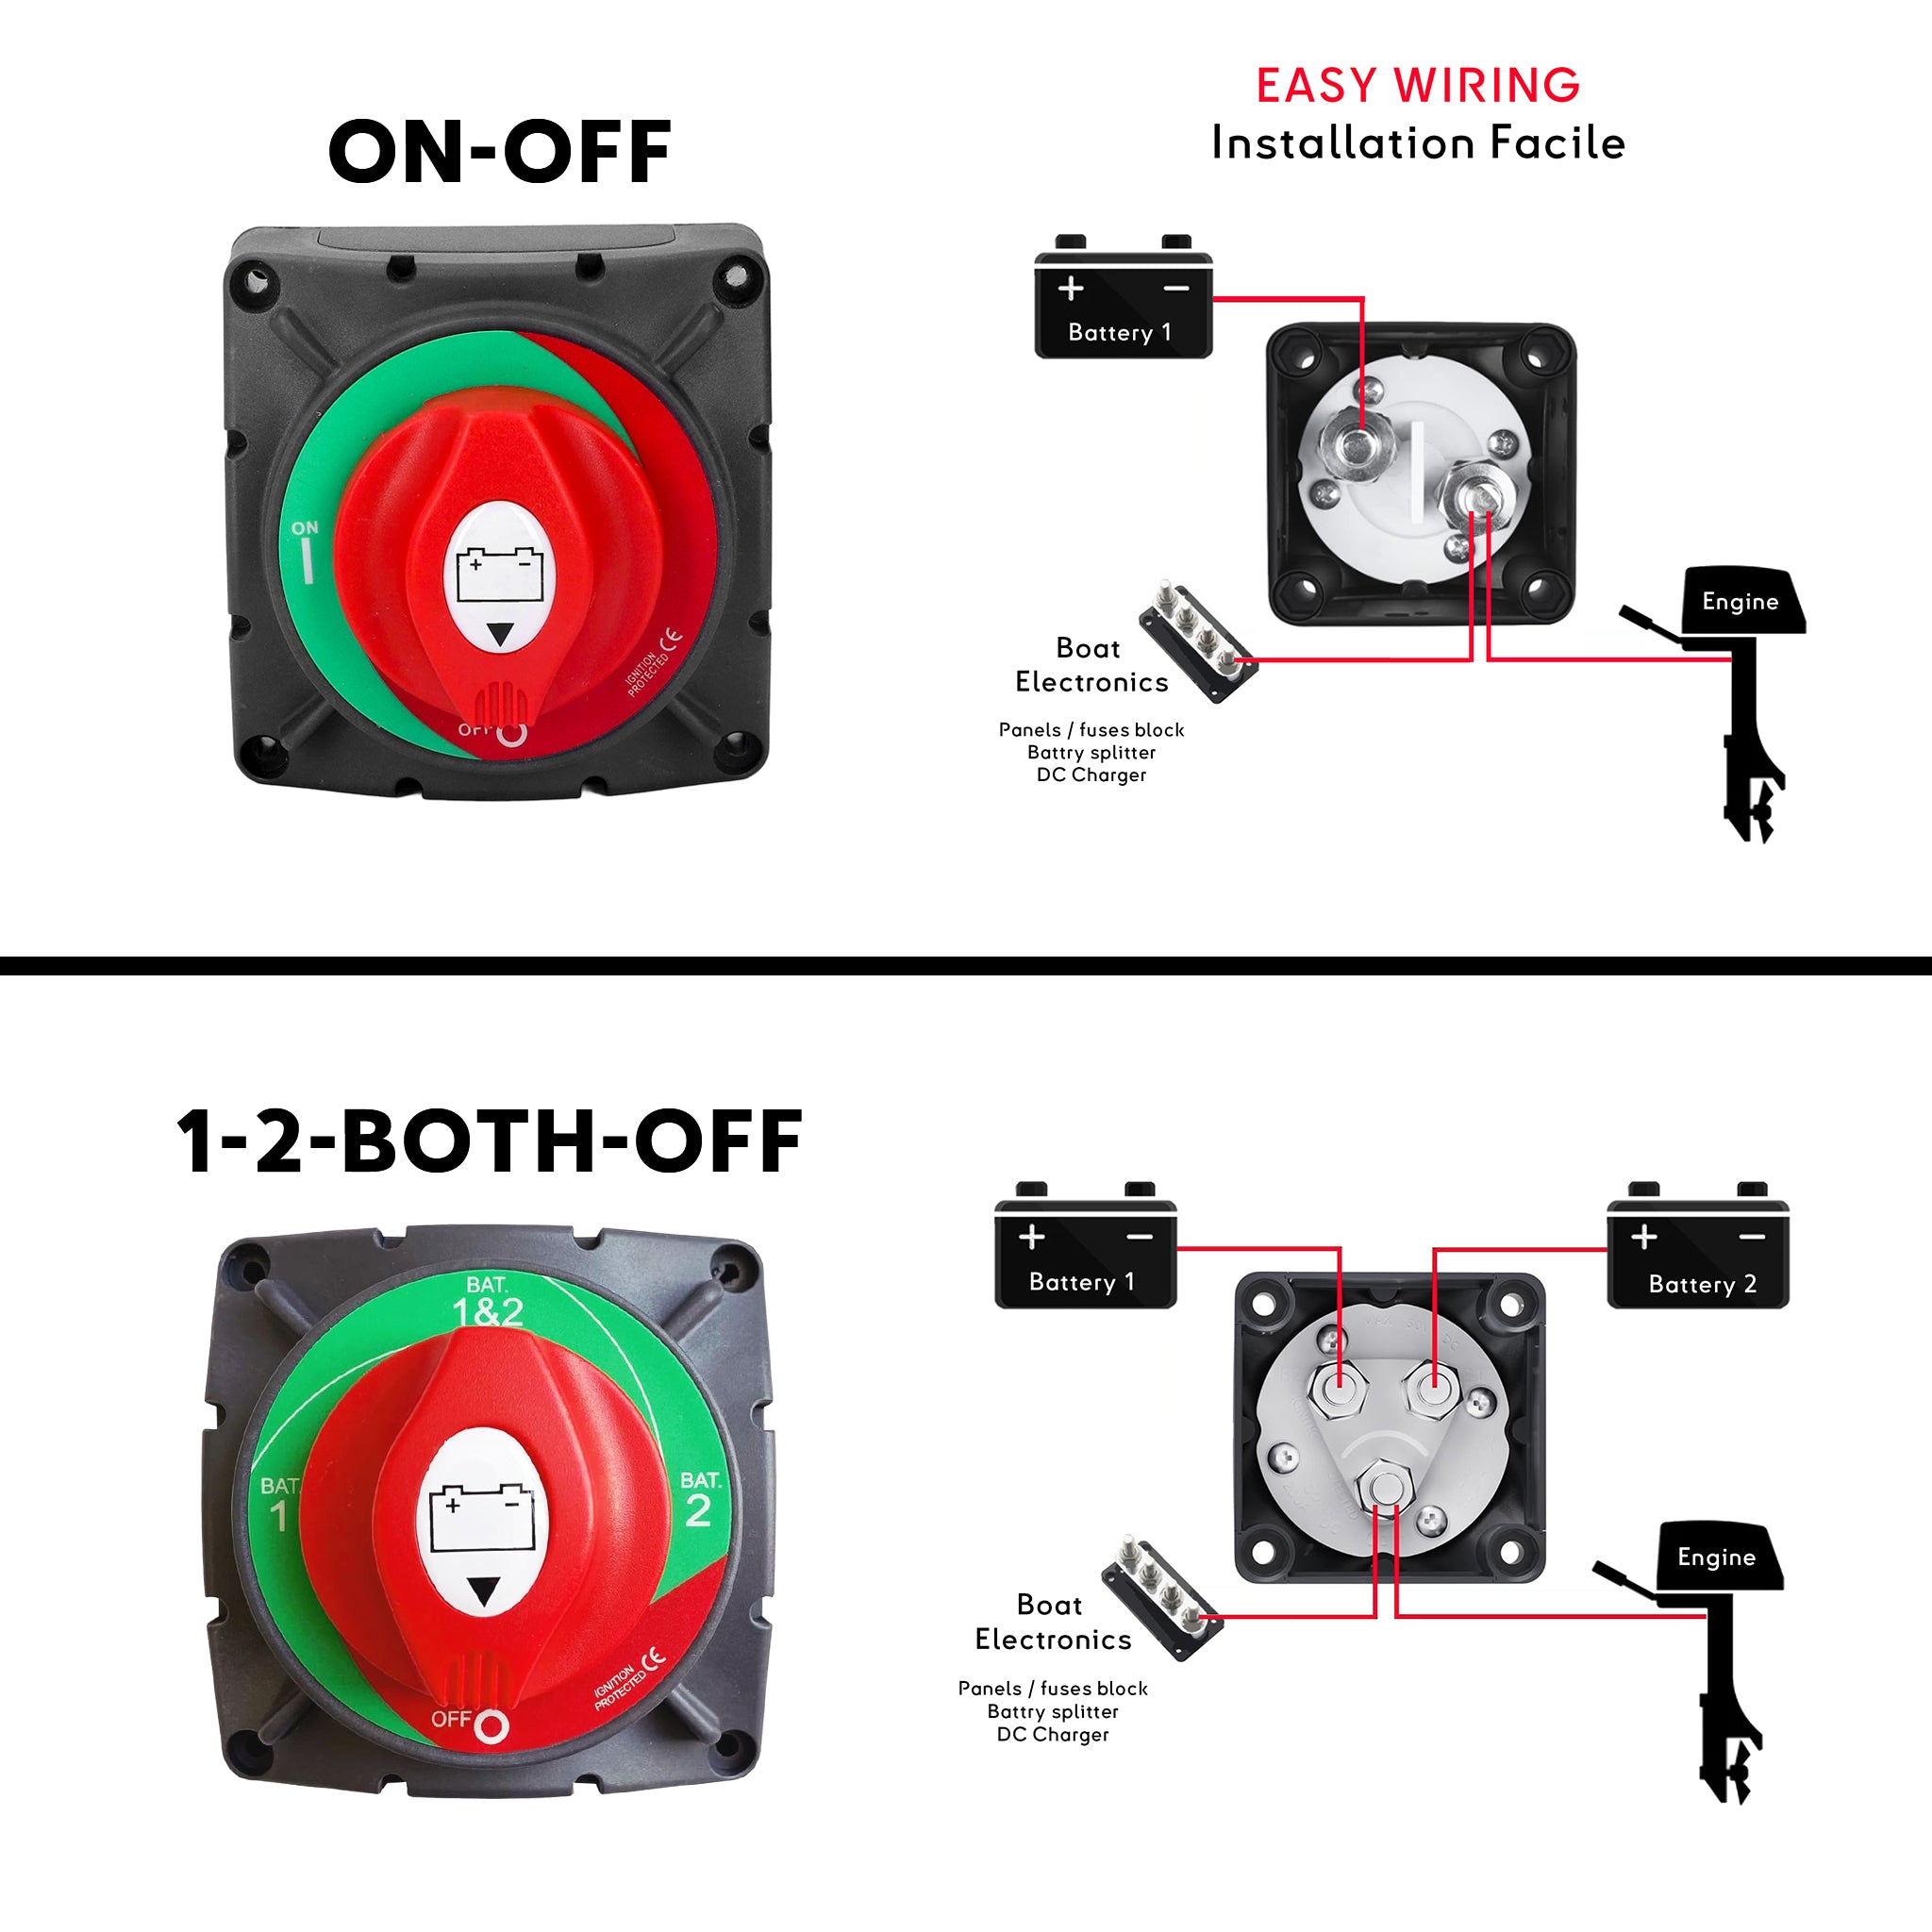
| Classic ON/OFF | OFF • ON | 300 A | Runabouts, single-bank sailboats |
| Selector 1-2-Both-Off | OFF • 1 • 2 • BOTH | 275 A | Cruisers with start + house banks |
| Compact Rotary | OFF • ON | 50 A – 300 A | RIBs, jet skis, tenders, small sailboats |
*Continuous ratings are shown for the highest-capacity model in each family.
Pro tip – avoid “BOTH/ALL” at anchor
“BOTH” links the banks. Great for a jump-start, but if you leave it on while the fridge runs you can drain both batteries.
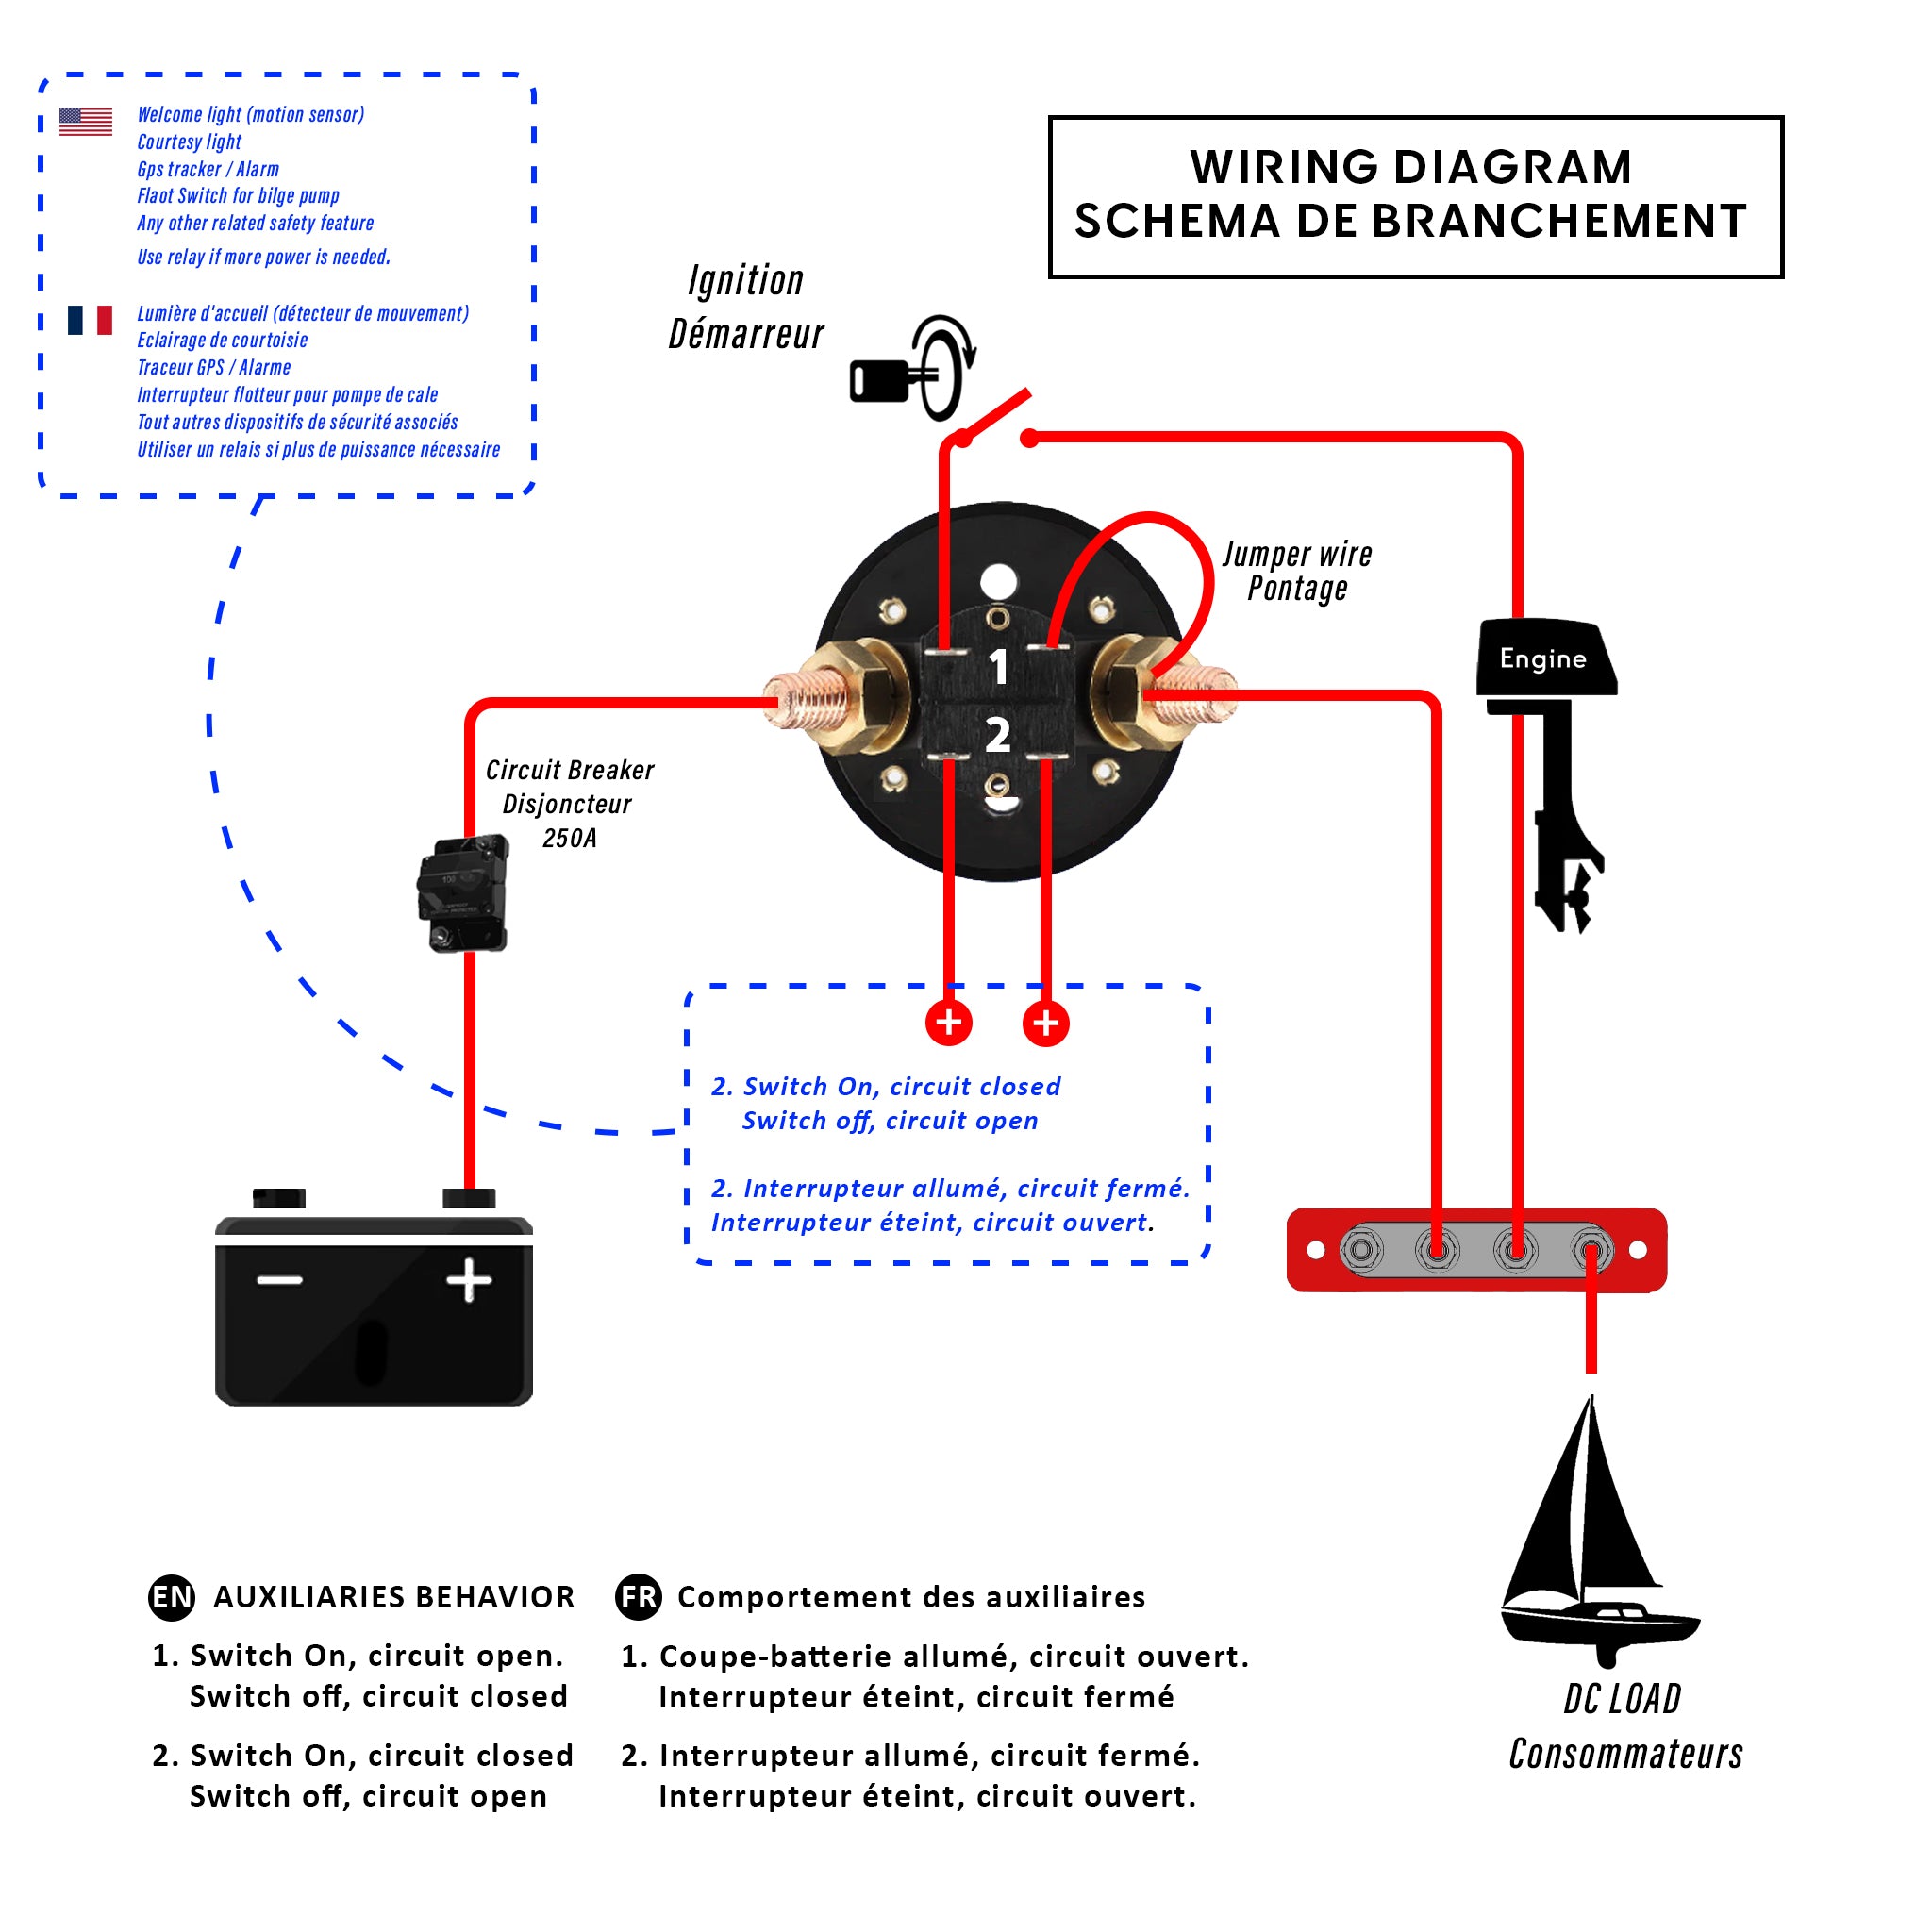
Here's a wiring diagram for a 1-2-Both-Off switch setup:
And here's how to wire with an ON/OFF switch with auxiliaries so that some instruments or functions stay on, which is very useful for small boats:
Bonus tip – Sequence your startups to reduce a surge
Think like a pilot. After turning on your battery switch, don’t energize every device at once. Powering on inverters, fridges, compressors, or other heavy loads all at once can cause a high inrush current and brief voltage drops, especially on older systems or compact boats. These micro-surges can lead to:
- Premature wear of sensitive electronics
- Arc flashes at switches or relays
- Nuisance tripping of breakers
Starting your onboard systems one by one not only avoids these spikes but extends the life of every component downstream. Even instruments rated for surge can wear faster under repeated stress. Ideally, installing a 12V–12V stabilizer helps buffer these fluctuations and ensures consistent voltage for sensitive electronics.
3. Automatic Helpers: VSR & Dual-Battery Isolator
| Automation | Baywatt Model | How It Works | Best For |
|---|---|---|---|
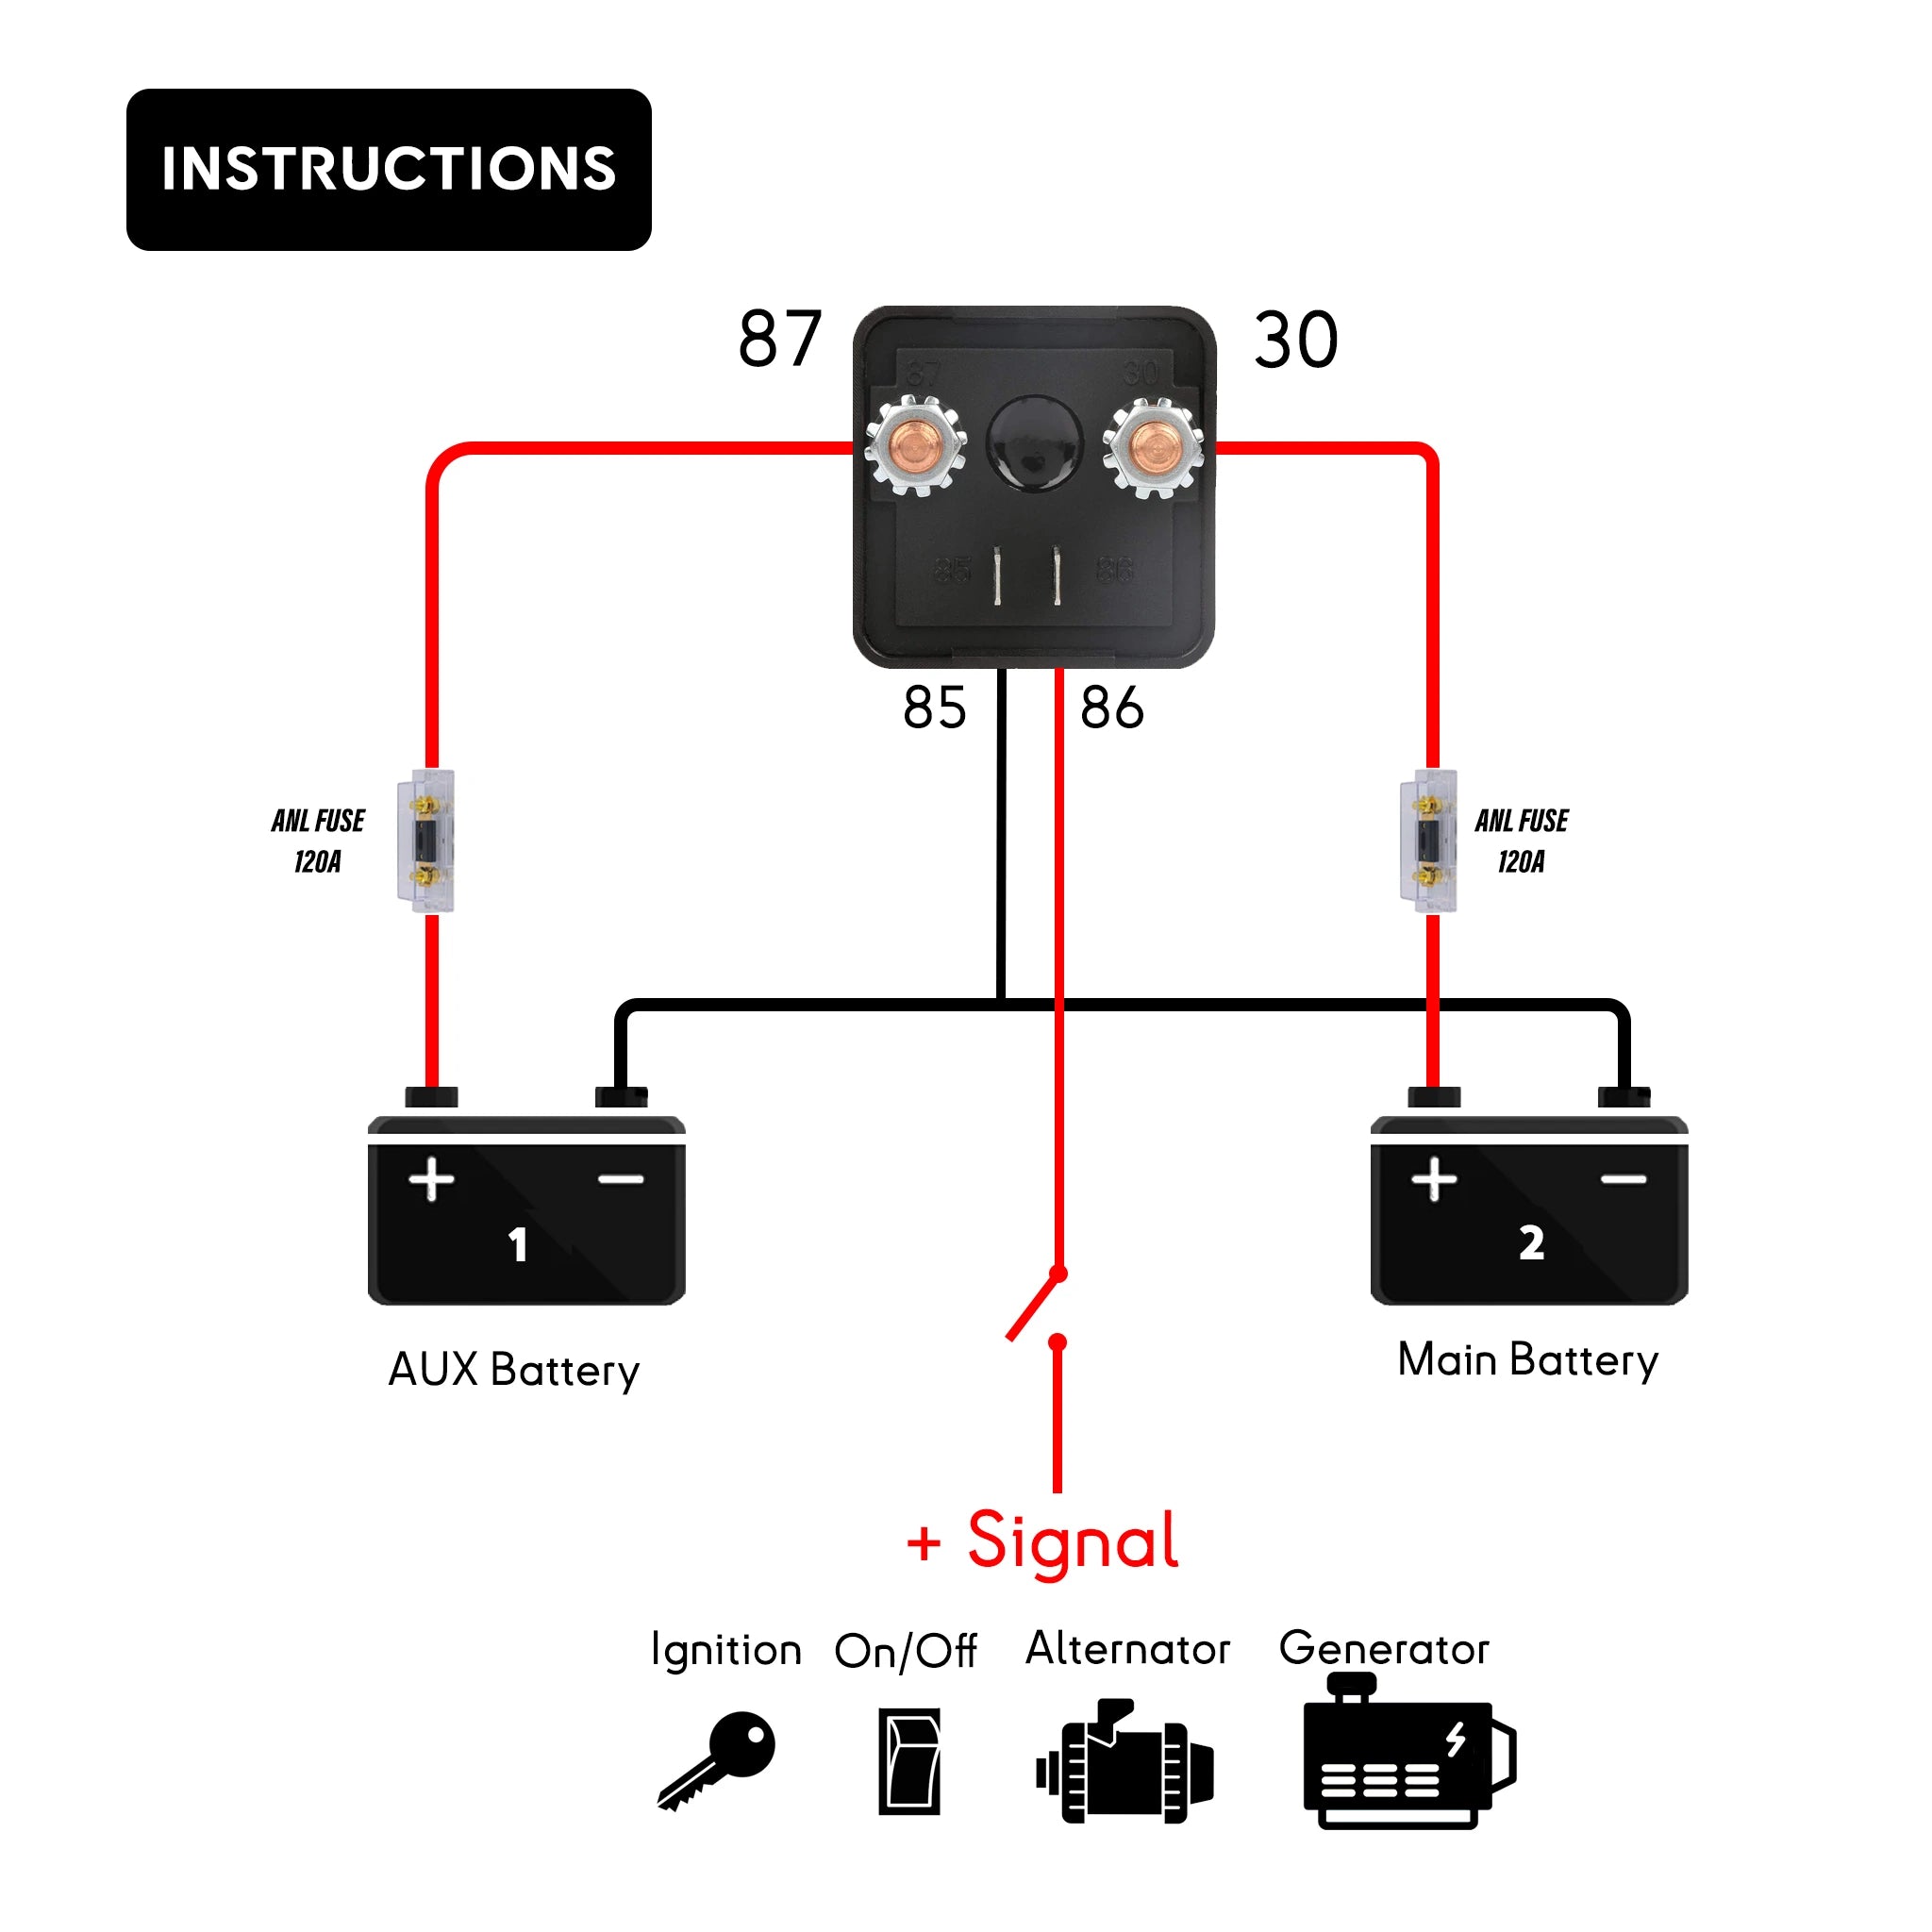
| Voltage-Sensitive Relay | BI12140 – 140 A | Connects banks when voltage ≥ 13.3 V, opens at ≤ 12.8 V | Simple alternator charging on twin-bank boats |
| Smart Dual-Battery Isolator | BI12200 – 200 A | Solid-state relay triggered by ignition/charge sense line | Outboards, bow-thrusters, lithium upgrades |
Automation removes the human error factor: no more forgetting to switch back after a day underway.
4. Add Over-Current Protection Close to the Bank
Right after the battery switch, you should fit a thermal circuit breaker. Baywatt gives you two marine-proof choices:
| Breaker | Amp Range | Extra Feature | Why It Matters |
|---|---|---|---|
| Thermal CB with LED | 30 A – 150 A | LED shows the trip status | Fast fault-finding during night checks |
| BSC “2-in-1” CB + Disconnect | 60 A – 300 A | Acts as both breaker and switch | Redundant isolation if the main switch fails |
Mounting the breaker within 20–25 cm of the battery keeps all downstream cables protected.
5. Choosing the right setup for Boat Battery Switches
Count your banks
• One battery? → Classic ON/OFF or Compact Rotary
• Two banks? → Selector 1-2-Both-Off plus a VSR or 200 A isolator
Check your charging source
• Alternator only? → VSR
• Lithium, high-output alternator, or AC charger? → 200 A isolator
Plan redundancy
Even with automation, having a manual switch and a breaker-disconnect combo (like the BSC) gives you a bulletproof fallback.
6. Installation & Operating Tips
• Mount the switch close to the batteries, yet where you can reach it in an emergency
• Use clear labels: BANK 1 (Start), BANK 2 (House)
• Spin a selector through OFF only when the engine is not running
• Reserve BOTH for quick jump-starts or equalizing charges—then return to your normal bank
7. Quick FAQ
Can I leave the switch in “ON” permanently?
Yes, on a single-bank boat—if a master breaker is fitted. On dual-bank setups, always leave the knob parked on your Start or House position when not in use.
Is a VSR the same as an isolator?
Not exactly. A VSR is voltage-driven and automatic. The 200 A isolator uses a trigger wire and handles higher surge loads, better suited for modern systems.
Do I still need a manual switch if I install a VSR?
Absolutely. Manual switches are required for full shutdown and help meet ABYC/ISO safety standards.
8. Key Takeaways
• Separate banks = reliable starts
• Baywatt manual switches put you in charge; VSRs/isolators automate charging
• Thermal breakers protect cables and can double as backup disconnects
• Sequential system start-up protects sensitive gear and prevents wear
We hope this blog helps you choose your next choice of marine battery switches.


